



Montessori Playroom in One Weekend: Six Step Setup for Real Homes
A Montessori playroom is a child-sized, visually calm space with a low shelf and a small number of complete activities. Start by placing one low shelf at your child’s height, then curate just 5 to 8 activities on it. That single shift, from toy bin chaos to a curated shelf, changes how your child plays almost overnight.
TL;DR:
- Keeping shelf items at your child’s height and limiting activities to 6-15 ensures longer engagement and supports independence.
- Shelves should be 24-30 inches high and 8-10 inches deep, with activities arranged from simple to complex and spaced apart to avoid clutter.
- Use complete, self-contained activities on trays, and rotate toys based on your child’s interest to maintain focus and curiosity.
- Define room zones with rugs and furniture placement, placing natural light near work areas and avoiding clutter near sleep zones for optimal function.
- Organize daily routines with picture labels and involve your child in maintenance to foster ownership and ease of clean-up.
Table of Contents
- What Is a Montessori Playroom, Really?
- Shelf Height, Depth, and Spacing That Actually Work
- Choosing Toys and Rotating Them Without Losing Your Mind
- Mapping Zones So Every Activity Has Its Place
- Small-Space and Shared-Room Setups That Still Work
- What to Buy, Thrift, or DIY
- Teaching the Reset: A Routine Your Child Can Actually Own
- Safety, Style, and Two Real-World Layouts
- Your Weekend Setup Checklist
- Letting Your Child Lead the Arrangement
- Getting Lighting and Layout Right
- Getting Your Child Involved in Upkeep
- Why Most Montessori Advice Skips the Hard Part
- Sources
- FAQ
What Is a Montessori Playroom, Really?
Forget the pastel dream rooms you see in catalogs. A Montessori playroom is built on three working principles: visual calm, child-height access, and a limited number of activities at any given time. Everything else, the color palette, the furniture brand, the wall art, is decoration on top of that foundation.
Visual calm doesn’t mean beige only. That’s one of the most persistent myths in Montessori circles, and it’s simply wrong. The actual goal is clarity, not the absence of color. A shelf can hold a bright red pouring set or a rainbow of sorting bowls as long as the overall space isn’t visually overstimulating. Clutter overwhelms a young brain; color, on its own, does not.
The “work cycle” is the other piece people miss. In Montessori terms, a child needs to be able to choose an activity, complete it start to finish, and put it away without asking you for help. That mean every tray needs everything the task requires already on it. A pouring activity isn’t a pitcher sitting alone on a shelf. It’s a pitcher, a small bowl, a sponge, and a tray, all together, so the entire task is self-contained.
This is where the “less is more” rule earns its keep. Classroom observation has found that toddlers played roughly twice as long with each toy when only four items were offered, compared with sixteen laid out at once. Fewer choices means longer, deeper concentration instead of grazing from toy to toy.
Before you touch a single shelf, check these three things:
- Can your child reach every item without asking for help?
- Is each activity complete with all its pieces on one tray?
- Would a stranger walking in see calm, or would they see clutter?
Pro Tip: If you’re staring at a shelf full of toys and feeling stuck on what to cut, start by removing anything missing a piece. An incomplete puzzle or a game with no instructions isn’t an activity, it’s just visual noise.
Shelf Height, Depth, and Spacing That Actually Work
Shelving is the backbone of any Montessori playroom setup, and the measurements matter more than most parents expect. A shelf that’s too tall defeats the entire purpose of independence.
Measure from the floor to your child’s chest or shoulder height. For toddlers, that typically puts the top shelf between 24 and 30 inches off the ground. Depth matters just as much as height: 8 to 10 inches deep is the sweet spot. Deeper shelves invite items to get pushed to the back and forgotten, which turns your curated shelf right back into a junk drawer.
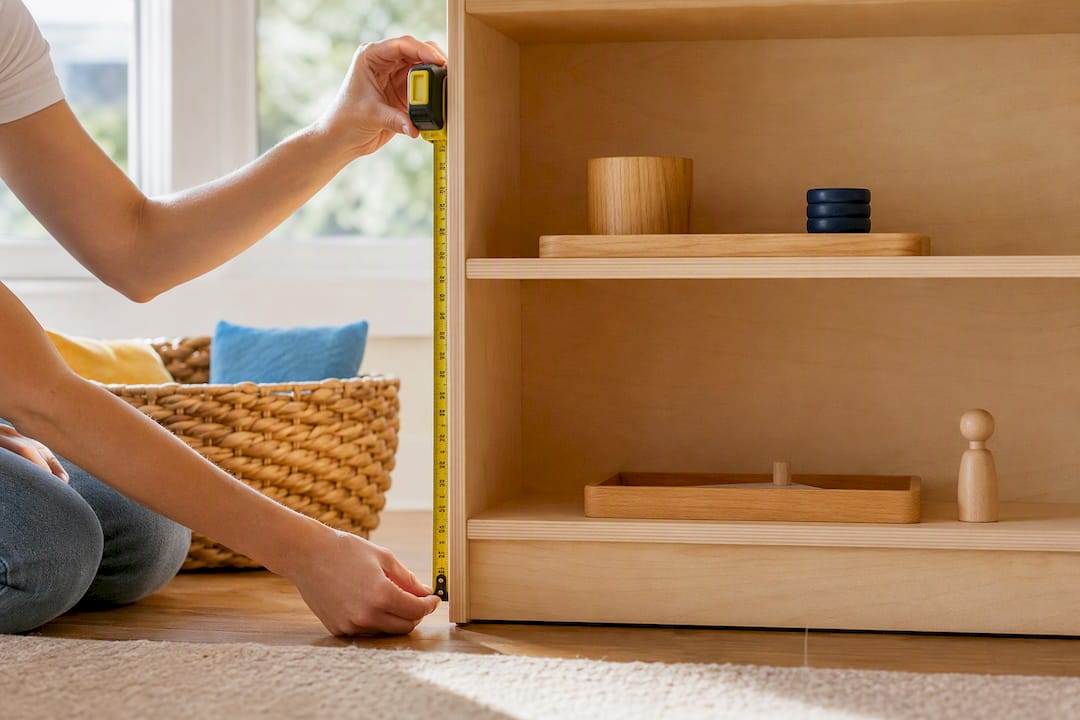
Arrangement isn’t random either. Place activities left to right, moving from simplest to most complex, the same way a book reads. This mirrors how Montessori practitioners set up classroom shelves, and it gives your child an intuitive sense of progression without you saying a word. Leave visible empty space between trays. A shelf packed edge to edge reads as clutter, even if every item is technically “complete.”
A few small habits make a bigger difference than the shelf itself:
- Use one tray or shallow basket per activity, never a shared bin.
- Face labels or images outward on containers so pre-readers can self-select.
- Store loose small pieces (puzzle knobs, counting bears) in a lidded container within the tray, not scattered.
- Reserve the bottom shelf for the bulkiest or heaviest items, like a block basket.
Choosing Toys and Rotating Them Without Losing Your Mind
A “complete activity” is any task a child can start, finish, and clean up solo. That’s the filter for every single item that lands on your shelf, regardless of age.
For infants, think simple cause-and-effect: a wooden object permanence box, a ring stacker, a soft ball that rolls predictably. For toddlers, complete activities might include a pouring set (pitcher, bowl, sponge, tray), a three-piece knob puzzle, a basket of blocks sorted by shape, or a simple sorting tray with matching lids and containers. Preschoolers can handle multi-step self-care tools: a child-sized broom and dustpan, a snack-prep station with a small knife and cutting board, or a lacing card set.
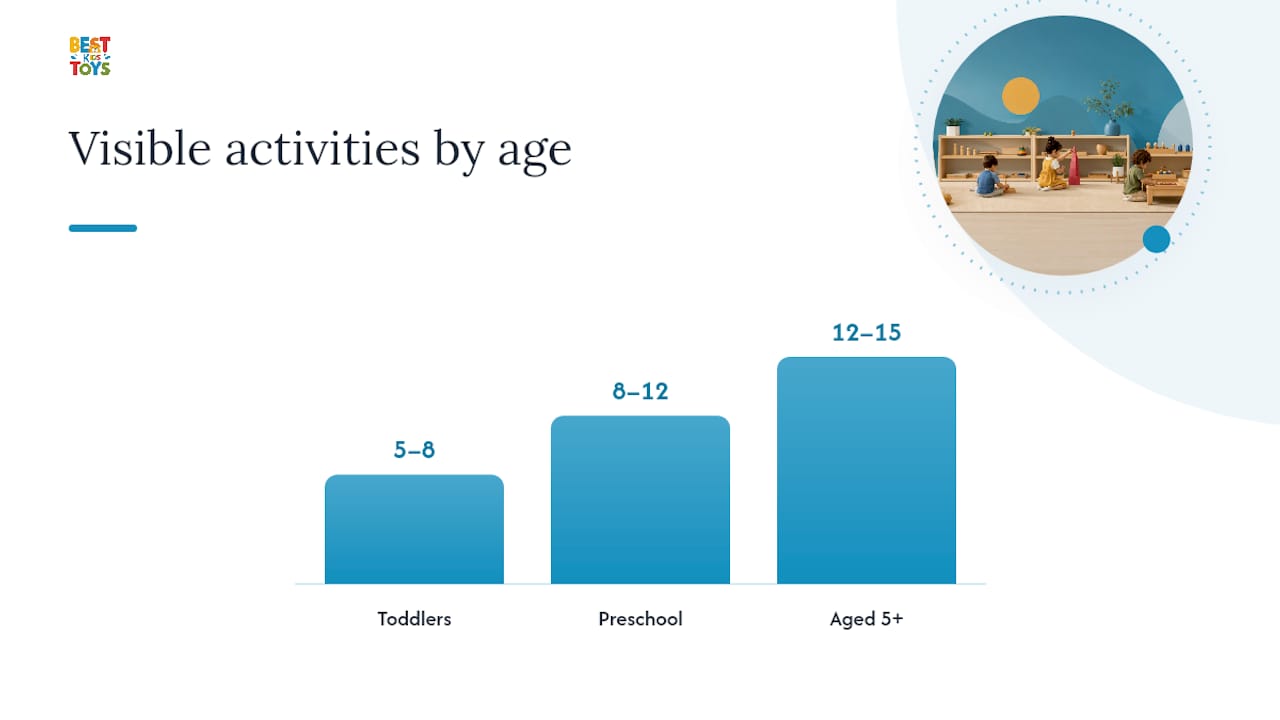
- Start with 5 to 8 visible activities for toddlers.
- Move to 8 to 12 for preschool-age children as attention spans lengthen.
- Expand to 12 to 15 for children aged 5 and up who can manage more complexity.
These ranges aren’t arbitrary. They reflect the same principle behind that classroom study on fewer toys extending play duration: a shelf is a display case for what’s actively in rotation, not long-term storage. Keep the rest of your inventory in a closet or bin out of sight.
Rotation should follow your child’s interest, not a fixed calendar. When a toy sits untouched for a few days, swap it out and reintroduce it a month or two later; it will often feel brand new again. Our guide on Montessori toys that make independent play more exciting walks through specific picks that hold up well across several rotation cycles.
Pro Tip: Keep a simple note on your phone listing what’s currently on the shelf and the date it went up. When you’re deciding what to rotate out, you’ll have real data instead of guessing.
Mapping Zones So Every Activity Has Its Place
A functional playroom isn’t one big open space. It’s a handful of smalls, clearly defined zones, each matched to a type of activity.
The core zones you’re working with: a movement or floor zone with a rug or mat for building and gross motor play, a table-and-chair zone for fine-motor and table-top work, a low shelf zone for materials storage and display, and a cozy reading corner with a small bookshelf and floor cushion. Practical life activities, pouring, sweeping, dressing frames, often work best near the shelf zone or a dedicated low table.
Sketch your room on paper before moving furniture. Note where natural light falls and how foot traffic moves through the space. Quiet zones, like reading corners, belong away from doorways and high-traffic paths. This isn’t just aesthetic preference; floor-based, distraction-free play supports the kind of sustained motor and social engagement that pediatric development guidance points to for young children.
A few placement rules keep the layout functional:
- Shelves go against walls, never floating in the middle of the room.
- Keep the center of the room clear for floor-based building and movement.
- Position the table zone near a window when possible for natural light during focused work.
- Anchor the reading corner in the quietest corner of the room, away from the main door.
Small-Space and Shared-Room Setups That Still Work
You don’t need a dedicated playroom to run a real Montessori setup. A shared bedroom, a living room corner, or a hallway nook can work with one shelf and some intention.
Start with a single shelf and prioritize six items: one pouring or practical life tray, one puzzle, one sorting activity, one block or building set, one sensory item, and one book on a small stand. That’s a complete starter shelf. Everything else, your back-stock rotation supply, goes in a closet bin or under-bed container, fully out of sight.
Rugs do a lot of heavy lifting in small spaces. A single rug defines a floor-work zone without needing extra square footage; a low table on top marks a table-work zone within the same room. Vertical wall shelves, securely anchored, can hold a rotating book display or a small sensory basket without eating into floor space at all. Our storage guide covers specific containers that fit tight closets and shared rooms well.
In small spaces, rotate more often, roughly every one to two weeks instead of monthly, since a smaller shelf shows wear on novelty faster.
What to Buy, Thrift, or DIY
Furniture priorities come down to three things: stability, child scale, and an open front so nothing is hidden behind doors. Wood is the traditional Montessori material of choice for its weight and durability, but a sturdy, non-toxic composite shelf is a perfectly acceptable substitute if budget is tight.
Some of the best Montessori furniture hacks aren’t Montessori-branded at all. An IKEA Kallax turned on its side instantly becomes a low, open-front shelf at close to ideal toddler height. Wooden cutting boards or bread trays from a thrift store make excellent activity trays. Thrifted glassware, a small creamer and bowl set, works beautifully for pouring practice.
Your weekend shopping list:
- One low, open shelf (new or repurposed)
- Four to six small trays or shallow baskets
- One rug to define a floor zone
- A handful of thrifted glass or ceramic vessels for pouring work
- Wall anchors for securing the shelf
Teaching the Reset: A Routine Your Child Can Actually Own
A shelf only stays organized if your child can put things back without you doing it for them. That starts with a one-minute reset routine, not a full cleanup lecture.
- Use picture labels or shape outlines on the shelf so each item has one visible “home.”
- Demonstrate a new activity in 2 to 3 minutes, slow and mostly silent, then step back and let your child work.
- If reset breaks down, don’t add rules, simplify. Reduce the number of pieces, lower the shelf, or swap a multi-part toy for a single-piece one.
Short, quiet demonstrations work better than long explanations. A 2 to 3 minute presentation is typically enough for a child to grasp a new activity and start working independently.
Pro Tip: If your child abandons an activity mid-reset every time, the task itself is likely too complex, not your child. Cut it down to fewer steps before assuming the routine has failed.
Safety, Style, and Two Real-World Layouts
Before anything goes on a shelf, anchor it to the wall. Tip-over incidents are one of the most preventable playroom hazards, and every open shelf needs a wall strap regardless of how sturdy it looks. For children under 3, skip anything with small, detachable pieces that pose a choking risk, and choose rugs with non-slip backing so they don’t slide during floor play. Stick to non-toxic finishes on any wood furniture.
Visual calm doesn’t require draining every color from the room. Use texture and a coherent palette instead of pure neutrals: a woven basket, a wooden tray, one or two accent colors repeated across a few items. The goal is clarity, not blandness.
Two quick examples: In a shared living room corner, shelf one holds a pouring set, a shape sorter, and a board book; a folded rug marks the floor zone beside it. In a small dedicated nook, shelf one holds practical life trays, shelf two holds puzzles and fine-motor work, and a floor cushion anchors the reading corner in the opposite corner.
Your Weekend Setup Checklist
You can build a working Montessori playroom setup in a single weekend if you follow these steps in order.
- Measure your child’s chest height to determine your shelf height target.
- Choose or repurpose one low, open shelf.
- Curate 6 activities from what you already own.
- Lay a rug to define the floor zone.
- Anchor the shelf securely to the wall.
- Walk your child through the reset routine once, then let them try it solo.
For a quick mental picture: shelf one might hold a pouring tray, a simple puzzle, and a sorting basket; shelf two could add a lacing card and a small block set; the reading nook needs just three or four board books facing outward and a floor cushion. Snap a photo before you start and another once it’s set up. That before-and-after comparison is often the moment parents realize how much of the original clutter wasn’t adding anything at all.
Letting Your Child Lead the Arrangement
Child-led doesn’t mean chaos. It means the room responds to what your child actually gravitates toward, rather than what looks good in a photo. Pay attention to which shelf items get picked up daily and which sit untouched. That’s real data about interest, not a failure of your setup.
Involve your child directly in small decisions once the basic structure exists. Ask which two books belong on the reading shelf this week, or let them choose between two trays to feature up front. This isn’t about handing over full control of the room. It’s about giving a young child real, bounded choices inside a structure you’ve already built, which is the entire premise behind Montessori independence.
Watch for signs an activity has outgrown its usefulness: a puzzle solved instantly without pause, or a sorting tray ignored after one attempt. Both signal it’s time to rotate in something with slightly more challenge. Sensory materials in particular tend to hold attention longest when they engage touch, sound, or texture directly. A parent’s guide to sensory play breaks down why that hands-on engagement matters so much for early development.
The arrangement itself should shift subtly over weeks, not stay frozen from the day you set it up. A room that evolves with your child’s actual interests is doing its job. One that stays static because you liked how it looked initially usually isn’t.
Getting Lighting and Layout Right
Natural light does more for a playroom than any shelf or toy choice. Position your table-work zone near a window whenever the room allows it; direct daylight makes fine-motor tasks like lacing or pouring noticeably easier on young eyes, and it naturally draws children toward that zone during the day.
Avoid harsh overhead lighting as the only source in the room. A warm floor lamp or a small table lamp near the reading corner creates a softer, calmer feel that lines up with the same visual-calm principle guiding your shelf choices. Overhead fluorescent-style lighting tends to flatten a room and can make an already busy space feel more chaotic than it is.
Layout and light work together. A room with one bright window should have its quietest zone, usually reading, positioned to catch that light without direct glare. Movement and floor-play zones can handle more ambient or artificial light since children are less focused on fine visual detail during gross motor play. Keep walkways between zones clear of furniture edges, especially near the shelf, since a young child moving through the room independently needs a predictable, obstacle-free path.
If your playroom doubles as a bedroom, position the shelf and table zones away from the bed itself. Mixing sleep space visually with play space tends to undercut both the calm needed for rest and the focus needed for work.
Getting Your Child Involved in Upkeep
A child who helped build the system is far more likely to maintain it. Start small: let your child carry their own tray back to the shelf after each activity, even if it takes longer than doing it yourself.
Visual cues do a lot of the teaching for you. A shape outline or small photo taped to the shelf where each tray belongs turns “put it away” into something your child can verify independently, without you checking their work. This is the same labeling logic used in the reset routine, just extended into daily habit rather than a one-time lesson.
Give your child small ownership decisions on a regular basis: which item to feature this week, whether a toy still feels interesting, when something feels “too easy.” These aren’t abstract questions to a 3 or 4 year old. They’re concrete, answerable, and they build a sense that the room belongs to them, not just to you.
When upkeep breaks down, resist the urge to take over completely. Instead, walk back through the same simplification steps used for reset troubleshooting: fewer pieces, a lower shelf, an easier task. A child who struggles to maintain a shelf usually needs an easier system, not more supervision.
Why Most Montessori Advice Skips the Hard Part
Most Montessori content online sells you a finished room: white walls, matching wooden trays, a shelf that looks like it belongs in a design magazine. That’s not wrong, exactly, but it skips the part that actually matters for a family working with a spare bedroom corner or half a living room wall.
The research behind this approach doesn’t point to aesthetics as the driver of independent play. It points to item count, shelf accessibility, and activity completeness. A shelf with six thrifted items, arranged with real spacing and matched to your child’s actual height, will outperform a beautifully styled shelf with twenty toys crammed onto it every time. Parents chasing the aesthetic often skip the measuring and the item-count discipline, then wonder why their child still dumps every bin on the floor.
If you take one thing from this, prioritize the shelf height and the item count before anything else, including color scheme, before anything else. Everything downstream, the calm, the independence, the actual play, follows from getting that part right first.
— Danica Hodge
Sources
- Montessori Shelves: How to Set Them Up and Why They Work | Montessori Guide
- Montessori Playroom Setup: The Complete Guide
- Grace and Courtesy / practical guidance | Camden Montessori
- Montessori playroom ideas | Guidepost Montessori blog
FAQ
What are the must-haves for a Montessori playroom?
The essentials are a low, open shelf sized to your child’s height, 5 to 15 complete activities depending on age, a defined floor zone with a rug, and a simple reset routine your child can follow independently.
How do I create a Montessori-style playroom?
Measure your child’s chest height for shelf placement, select a small number of complete activities arranged from simple to complex, define zones with rugs or furniture placement, and rotate toys based on interest rather than a fixed schedule.
What is the Montessori approach to playrooms?
The approach centers on visual calm, child-height accessibility, and limited choice, built around the idea that a child should be able to select, complete, and put away an activity without adult help.
What are some good Montessori play items?
Complete activities like pouring sets, simple wooden puzzles, sorting trays, block baskets, and self-care tools such as a child-sized broom all work well, provided every piece needed for the task is included on the tray. Our collection of toys for ages 3 to 4 includes several options built around this exact principle, and our sensory toy collection rounds out a shelf with hands-on materials that hold attention well during rotation.